Walkway Pressure Washing: A Step-by-Step Homeowner Guide

The walkway pressure washing process is a four-phase sequence — prep, pre-treat, controlled washing, and rinse/finish — that strips dirt, mold, mildew, and stains from concrete, pavers, brick, and stone to restore surface appearance and traction. According to This Old House, the process works best when you match pressure and nozzle to the surface, protect nearby plants and fixtures, and test a small patch before committing to the full run.
The four core phases at a glance:
- Prep: clear debris, protect plants and fixtures, test an inconspicuous patch
- Pre-treat: apply detergent or diluted bleach solution and let it dwell
- Wash: use the correct PSI, nozzle, and motion for your surface type
- Rinse and finish: flush residue toward drainage, inspect, and treat stubborn spots
DIY is reasonable for a standard concrete path with light-to-moderate soiling. Hire a professional when the surface is delicate (natural stone, painted pavers), staining is severe, or safety concerns like steep grades or proximity to electrical fixtures are present.
Key Takeaways
Matching pressure, nozzle, and chemistry to your specific surface type is what separates a clean walkway from a damaged one.
| Point | Details |
|---|---|
| PSI and GPM both matter | Concrete needs 2,500–3,000 PSI; higher GPM flushes debris more effectively than peak pressure alone. |
| Test patch before full run | Always test an inconspicuous area first and stop immediately if etching or discoloration appears. |
| Pre-treat before washing | Apply cleaner and allow 5–10 minutes of dwell time; chemistry does the work pressure alone cannot. |
| Soft-wash for delicate surfaces | Use low pressure with chemical solution on painted, stained, or softer masonry surfaces. |
| E and R Cleaning Solutions | Offers surface-matched pressure washing with commercial equipment, full insurance, and per-project pricing. |
Table of Contents
- What tools and supplies do you need before starting?
- How do you avoid injury and surface damage?
- The step-by-step walkway pressure washing process
- How do you handle oil, rust, algae, and other stubborn stains?
- Soft-washing vs. pressure washing: which method fits your surface?
- How long does it take, and what does it cost?
- When should you DIY, and when should you hire a pro?
- A field perspective on what actually matters
- E and R Cleaning Solutions handles the hard part for you
- Sources
What tools and supplies do you need before starting?
Getting the equipment right before you touch the trigger saves time and prevents surface damage.
Pressure washer specs: For concrete, Motor For Nerd recommends roughly 2,500–3,000 PSI for heavy-duty jobs. GPM matters just as much as PSI — higher GPM flushes loosened debris more effectively than raw pressure alone. For pavers and natural stone, stay in the 1,200–1,800 PSI range to avoid dislodging joint sand or etching softer surfaces.
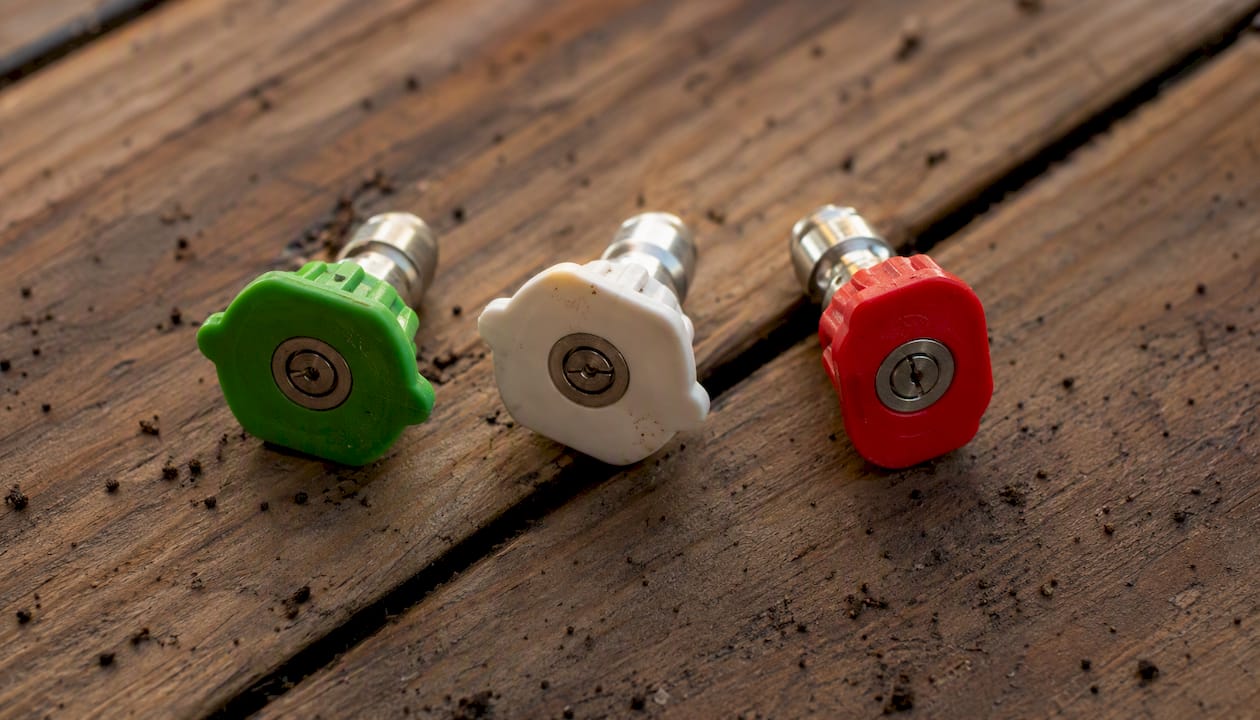
Nozzle set: A 25-degree (green) tip works for most concrete. A 40-degree (white) tip suits pavers and stone. Avoid the 0-degree (red) tip on any walkway surface — it concentrates pressure into a pinpoint that gouges concrete and destroys grout lines.
Surface cleaner attachment: Worth renting if you don’t own one. It distributes pressure evenly across a spinning bar, which eliminates the tiger-striping a wand leaves on flat surfaces.
Cleaning solutions:
- Sodium hypochlorite (bleach) diluted at a 9:1 water-to-bleach ratio for mildew and biological growth
- Concrete degreaser for oil and grease stains
- Oxygen bleach (sodium percarbonate) as a gentler option for colored pavers where chlorine bleach risks fading
PPE and site prep:
- Safety glasses and closed-toe shoes (non-slip)
- Waterproof gloves when handling bleach solutions
- Plastic sheeting or tarps over nearby plants and garden beds
- Waterproof tape over exterior electrical outlets and light fixtures
Pro Tip: Wet down surrounding plants before you apply any cleaning solution, and rinse them again immediately after. The dilution buffer significantly reduces chemical burn on foliage.
How do you avoid injury and surface damage?
Pressure washers are deceptively powerful. Even a residential unit set to a low pressure can break glass, split wood, or strip paint — so operating discipline matters more than the machine’s spec sheet.
Safe operating behaviors:
- Never point the wand at people, pets, or windows
- Keep both feet planted on stable ground; never operate from a ladder
- Keep the nozzle moving at all times — pausing on one spot etches the surface
- Wear safety glasses; water and debris ricochet at speed
Surface protection rules:
- Always test a small, inconspicuous patch first and stop immediately if you see etching or discoloration
- Start with a wide-angle tip (40-degree) at low pressure and step up only if needed
- Hold the nozzle 12–18 inches from the surface and spray at a 45-degree angle, not straight down
- Never use a 0-degree tip on walkways
Nearby hazard protection:
- Cover exterior electrical outlets with waterproof tape before you start
- Keep the spray away from window seals and caulked joints — sustained pressure degrades sealant
- Redirect runoff away from storm drains when using chemical cleaners; check local ordinances
Starting low and working up is the single most important habit in pressure washing. The damage from too much pressure happens in seconds and is often permanent — a gouged concrete surface or blown-out paver joint cannot be undone with a second pass.
Pro Tip: The most common DIY mistake is holding the wand too close and moving too slowly. Keep moving at a steady walking pace and maintain your 12–18 inch standoff distance throughout the pass.
The step-by-step walkway pressure washing process
Follow these steps in order. Skipping prep or rushing the pre-treat phase is where most jobs go wrong.
- Clear and sweep the surface. Remove furniture, pots, and loose debris. Sweep or blow off leaves and grit so they don’t clog the machine or scratch the surface during washing.
- Protect plants, fixtures, and drains. Wet nearby plants, cover them with plastic sheeting, tape over electrical outlets, and position a drain guard if you’re using chemical cleaners.
- Test an inconspicuous patch. Run the washer at your starting pressure on a hidden corner for 10–15 seconds. Check for etching, color change, or joint erosion before proceeding.
- Connect hoses and prime the equipment. Attach the garden hose to the pressure washer inlet, squeeze the trigger briefly to purge air, and confirm steady water flow before adding the nozzle.
- Apply pre-treatment solution. Use the soap nozzle (black tip) or a pump sprayer to apply your cleaning solution — a 9:1 water-to-bleach mix for mildew, or a degreaser for oil stains. Let it dwell for 5–10 minutes. Do not let it dry on the surface.
- Wash with the correct nozzle and motion. Switch to your working nozzle (25-degree for concrete, 40-degree for pavers). Work in overlapping passes, moving with the grain of the surface where possible. A surface cleaner attachment gives the most uniform result on flat concrete and prevents striping.
- Rinse thoroughly. Switch to a wide-angle tip and rinse from the highest point of the walkway toward drainage. Use high volume, lower pressure to flush the cleaning slurry completely off the surface.
- Inspect and re-treat stubborn spots. Walk the surface and mark any remaining stains. Re-apply targeted cleaner, let it dwell, and spot-wash with the wand at close range.
- Optional: seal the surface. Concrete and paver sealers extend the time between cleanings and resist future staining. Apply only to a fully dry surface, typically 24–48 hours after washing.
Pro Tip: Use a surface cleaner attachment for any flat run longer than 10 feet. The consistent pressure distribution eliminates the stripe pattern a wand leaves and cuts total washing time by roughly half.
How do you handle oil, rust, algae, and other stubborn stains?
Standard pressure washing removes surface grime, but specific stains need targeted chemistry before the washer does its job.
- Oil and grease: Apply a commercial concrete degreaser, work it into the stain with a stiff brush, and let it dwell for at least 10 minutes. Follow with a higher-pressure wand pass (25-degree tip, closer range) rather than a surface cleaner, which can spread the oil.
- Gum and adhesive: Freeze the deposit with a commercial freeze spray or dry ice, then scrape off the brittle residue with a plastic scraper. Pressure wash the remaining film immediately after.
- Rust stains: Use a chelator-based rust remover (oxalic acid or similar). Always test on an inconspicuous area first — some rust removers lighten concrete color. Pressure washing alone will not remove rust; the chemistry does the work.
- Algae and mildew: A biocide-containing cleaner or the 9:1 bleach solution works well with a 10-minute dwell time. After washing, consider a post-treatment biocide spray to slow regrowth — algae returns faster on shaded, damp surfaces without it.
- Efflorescence (white mineral deposits): An acidic cleaner (diluted muriatic acid or a proprietary efflorescence remover) dissolves the salts. Neutralize with water and baking soda solution before rinsing.
For gum stain specifics, the sidewalk gum stain guide from E and R Cleaning Solutions covers the chemistry in more detail.
Pro Tip: Always treat stains before the main wash, not after. Pre-treating lets the chemistry break down the bond while the surface is still dry, which makes the pressure wash far more effective.
Soft-washing vs. pressure washing: which method fits your surface?
Soft-washing uses low pressure (typically under 500 PSI) combined with a higher concentration of cleaning solution to kill biological growth chemically rather than mechanically. Pressure washing relies on mechanical force — higher PSI and GPM — to blast contaminants off hard surfaces.
Use soft-washing for:
- Painted or stained surfaces
- Vertical siding, stucco, and EIFS
- Older or softer masonry where high pressure risks erosion
- Surfaces with heavy algae or mildew where chemical kill is more effective than blasting
Use pressure washing for:
- Concrete walkways, driveways, and patios
- Brick and concrete pavers in good condition
- Surfaces with embedded dirt, oil, or gum that require mechanical removal
E and R Cleaning Solutions covers the full soft-washing methodology for commercial buildings in detail, including chemical ratios and dwell-time guidance.
Pro Tip: On a property with both vertical siding and a concrete walkway, soft-wash the siding first, then pressure wash the horizontal hardscape. This order keeps chemical overspray off a freshly washed surface.
How long does it take, and what does it cost?
Time estimates:
- Small residential path (up to 200 sq. ft.): 45–90 minutes including prep and rinse
- Standard driveway-length walkway (200–500 sq. ft.): 1.5–3 hours
- Long commercial sidewalk (500+ sq. ft.): half a day or more, depending on staining
Recommended cleaning frequency:
- Residential walkways: once or twice a year, typically in spring and fall
- High-traffic commercial sidewalks: quarterly or after major weather events
- Rental properties: at every tenancy turnover — E and R Cleaning Solutions covers this specifically in their guide on pressure washing between tenancies
Cost ballpark:
- DIY (equipment rental + supplies): roughly $50–$150 per session depending on rental rates and chemicals
- Professional service: pricing varies by square footage, stain complexity, surface type, and travel distance. Custom quotes are standard for anything beyond a basic concrete path.
What drives professional pricing up: heavy biological growth requiring biocide treatment, oil stains needing degreaser and agitation, natural stone requiring lower pressure and more time, and multi-surface properties.
When should you DIY, and when should you hire a pro?
DIY is a reasonable choice when:
- The surface is standard concrete or brick pavers in good condition
- Staining is light to moderate (dirt, light mildew, surface grime)
- You have access to a suitable pressure washer and the right nozzles
- No delicate elements (natural stone, painted surfaces, aging grout) are present
Hire a professional when:
- The surface is natural stone, painted, or shows signs of previous damage
- Staining is severe (deep oil, rust, or heavy biological growth)
- Safety concerns exist — steep grades, proximity to electrical fixtures, or height
- You need documentation for a landlord, tenant, or property sale
Questions to ask a contractor on the first call:
- Are you insured, and can you provide proof of liability coverage?
- What PSI and GPM does your equipment run, and which nozzles will you use on my surface?
- What cleaning chemicals do you use, and how do you handle runoff near plants and drains?
Trust signals worth looking for: before-and-after photos of comparable jobs, transparent itemized pricing, and a willingness to walk the site before quoting. For a broader checklist on onboarding an exterior cleaning provider, E and R Cleaning Solutions has a practical guide for property managers.
A field perspective on what actually matters
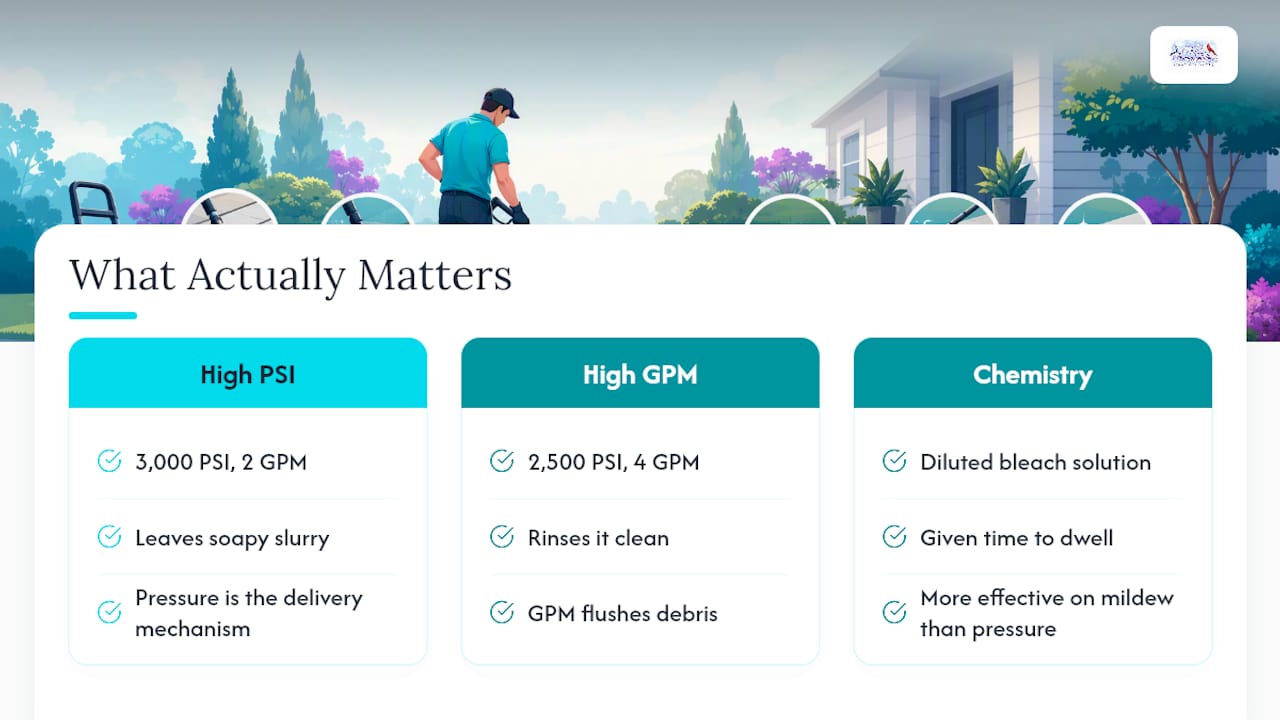
Most homeowners focus on PSI when shopping for a pressure washer or vetting a contractor. That’s the wrong number to lead with. GPM — the volume of water moving through the system — is what actually flushes debris off a surface once the pressure has broken the bond. A machine with 3,000 PSI and 2 GPM will leave a soapy slurry sitting on your concrete. A machine with 2,500 PSI and 4 GPM rinses it clean.
The second thing most DIYers underestimate is chemistry. A diluted bleach solution applied correctly and given time to dwell will do more work on mildew than increasing pressure alone. Pressure is the delivery mechanism; the cleaner is the active ingredient.
E and R Cleaning Solutions has seen both patterns repeatedly across residential and commercial jobs. The homeowner cleaning process guide reflects the same principle: method and chemistry first, equipment second. Five-plus years of field work across driveways, storefronts, and rental turnovers consistently shows that the jobs that go wrong share one trait — someone skipped the test patch.
E and R Cleaning Solutions handles the hard part for you
Pressure washing a walkway correctly takes the right equipment, the right chemistry, and the patience to do it in sequence. When the surface is delicate, the staining is stubborn, or you simply don’t want to spend a Saturday managing runoff and nozzle swaps, E and R Cleaning Solutions is the straightforward alternative.

Every job starts with a site assessment to match the method to your surface — concrete gets a different approach than natural stone or painted pavers. The team brings commercial-grade equipment, surface-appropriate cleaning solutions, and full liability insurance. Property managers can book walkway cleaning as part of a tenancy turnover package that covers driveways, sidewalks, and exterior surfaces in a single visit. Pricing is quoted per project with no hidden fees. To get a quote or check scheduling availability, contact E and R Cleaning Solutions directly at Eandrcleaningsolutions.
Sources
- How To Powerwash a Walkway – This Old House
- How to Power Wash Concrete Sidewalks: 2026 Pro Guide – Motor For Nerd