
Patio Black Spots: Homeowners Test a Patch, Then Wait 24 Hours
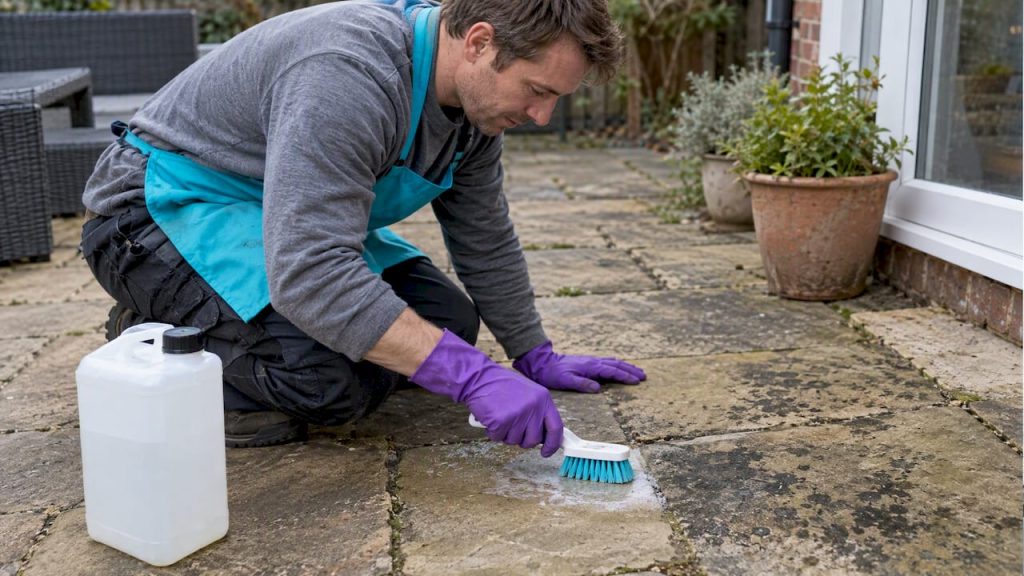
Most stubborn black spots on a patio are biological growth (lichen, algae, or moss) or pollutant crusts bonded to the stone, and pressure washing alone rarely clears them. The right first move is a test patch, then a material-safe biocide soak or a targeted poultice, never an acid wash on limestone, marble, or travertine. When that doesn’t fully clear the spots, a professional soft-soak with gentle, controlled pressure is the next step.
TL;DR:
- Test any cleaner on an inconspicuous area and wait 24 hours; acidic products can permanently etch limestone, marble, and travertine.
- Choose a biocide for lichen, algae, or moss, and let it sit for the label’s full dwell time before gentle brushing and rinsing.
- For pollutant stains on concrete or most pavers, use oxygen bleach; for deep stains, a covered poultice can draw residue out over several hours.
- Bonded pollutant crusts may need professional soaking for hours or days, followed by soft brushing and low pressure rather than aggressive blasting.
- Sweep leaves weekly, clear joints and corners, and improve drainage; recurring spots often return when shade, trapped moisture, or organic debris remains.
Table of Contents
- What’s Causing Those Black Spots on Your Patio?
- How to Safely Remove Black Spots by Surface Type
- Why Pressure Washing Alone Often Leaves Black Spots Behind
- What a Professional Patio Cleaning Visit Looks Like
- Keeping Black Spots from Coming Back
- When Cosmetic Perfection Isn’t Worth the Risk
- Let Us Handle the Stubborn Spots for You
- FAQ
- Sources
What’s Causing Those Black Spots on Your Patio?
Not every black mark on a patio has the same cause, and treating the wrong one wastes time and can damage the surface. Lichen shows up as scaly, crusty patches that feel rough and grip tightly to stone or concrete, often in gray-black or greenish-black colors. Algae and moss tend to look darker and feel slimy or fuzzy, especially where water collects or sunlight rarely reaches.
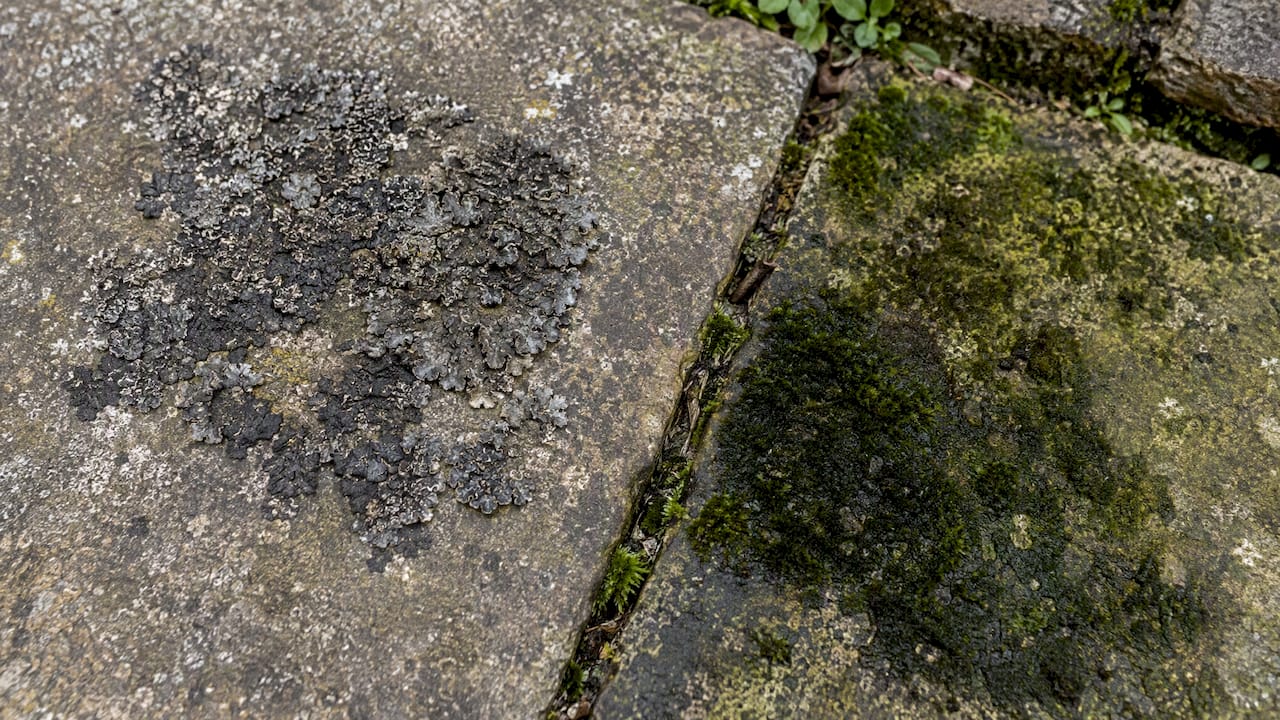
Pollutant crusts are different again. These form where rain never washes the surface, like under eaves, behind planters, or along sheltered wall bases, and they can become chemically bonded to the stone itself rather than just sitting on top of it, according to National Park Service guidance on masonry cleaning. That bonding is why pressure alone often fails against them.
A few other culprits get mistaken for black spots:
- Efflorescence appears as a white or grayish powdery bloom from salts migrating to the surface, not black at all, though it can trap dirt that darkens over time.
- Rust staining from metal furniture legs or tools leaves reddish-brown to dark spots that differ from biological growth under close inspection.
- Shaded, damp corners with poor drainage or leaf litter buildup create the ideal environment for lichen, algae, and moss to establish and spread.
Porous materials like natural stone and some concrete pavers absorb moisture and organic material deep into the surface, which gives growth and crusts something to hold onto below the visible layer, as explained in Remove Most Paver Efflorescence in Two Steps, Plus Pro Fixes. That’s part of why a stain that looks gone after a quick scrub often resurfaces within weeks. Sealing pavers can make future stains easier to remove because it reduces how deeply dirt and organic matter can penetrate in the first place.
Checking for what causes staining on concrete surfaces before you start treatment helps you match the method to the actual problem instead of guessing.
How to Safely Remove Black Spots by Surface Type
Before touching any cleaner, test it on a small, inconspicuous section of the patio and wait 24 hours to check for discoloration or texture changes. Document what you see; a patch that lightens slightly without etching is a good sign to proceed on the rest of the surface.
- Identify the material first. Concrete and most manufactured pavers tolerate biocides and oxygen bleach well, but natural calcareous stone (limestone, marble, travertine) reacts badly to anything acidic, which can permanently etch and pit the surface.
- Apply a biocide or algae cleaner for biological growth. These products target lichen, algae, and moss at the root rather than just stripping the visible layer, and dedicated lichen removers exist because lichen behaves differently from simple algae and often needs a product built for it.
- Let the product sit for its full dwell time, usually specified on the label, before scrubbing or rinsing. Rushing this step is the most common reason DIY treatments fail.
- Use oxygen-based bleach for pollutant stains and general grime on concrete and most pavers; it lifts organic staining without the etching risk that chlorine bleach or acid carries on sensitive stone.
- Build a poultice for stains that have soaked in, like oil residue or deep organic staining: mix an absorbent powder with the cleaning agent into a paste, spread it over the stain, cover, and let it draw the stain out over several hours before scraping away.
- Agitate gently with a nylon brush, never a wire brush or metal scraper, which can leave behind metal shavings that rust and create new dark spots on the surface.
- Rinse thoroughly with a garden hose or low-pressure setting so you aren’t just redistributing loosened residue into nearby joints and corners.
If you’re moving to a pressure washer for the rinse or for general cleaning, keep pressure in the range appropriate for the material. Soft natural stone and older pavers typically need the lowest effective setting with a wide fan nozzle held at a consistent distance, while dense concrete can tolerate more pressure. High pressure applied too close or at too narrow an angle etches soft stone, erodes joint sand, and can actually drive stains deeper instead of lifting them. A step-by-step walkway pressure-washing guide walks through safe technique in more detail, and our piece on DIY fixes for patio moss covers biological growth removal specifically.
Pro Tip: Always rinse from the top of a slope downward so loosened grime and cleaning residue don’t pool and restart staining in a low corner.
Look for products labeled as biocides, dedicated lichen removers, or oxygen-based bleach cleaners rather than generic all-purpose sprays; the product class matters more than the brand for getting a clean result on the first try.
Why Pressure Washing Alone Often Leaves Black Spots Behind
A pressure washer moves fast and clears loose dirt well, but it isn’t built to dissolve a crust that has become part of the stone’s surface chemistry. Pollutant crusts rich in gypsum or sulfate compounds can bond so tightly that blasting them only polishes the surface while the stain underneath stays put, a pattern National Park Service conservation guidance describes in detail for historic masonry.
Professionals approach these crusts differently:
- Extended soaking or misting cycles keep the surface wet for hours, sometimes up to a week for severe cases, which slowly softens the crust, a process that can take several hours to days, instead of trying to force it off in one pass.
- Low-pressure application during soaking avoids driving water and dissolved salts deeper into the stone’s pore structure.
- Gentle mechanical removal after softening, using soft brushes rather than scrapers, lifts the loosened crust with minimal abrasion to the sound stone beneath.
- Testing for free iron before any aqueous cleaning prevents a cleaning process from accidentally triggering new iron staining partway through the job, a step NPS guidance flags as standard practice.
There’s a trade-off worth naming honestly: removing a crust that has partly fused with the stone can take a thin layer of the material with it. Conservation-minded cleaning accepts that small, controlled loss as the cost of stopping further decay, rather than scrubbing harder and risking uneven damage across the whole surface.
What a Professional Patio Cleaning Visit Looks Like
When DIY methods stall out, the value of a professional visit is mostly in sequencing: knowing which chemistry to try first, how long to let it work, and when to stop. Here’s how we typically work through a patio with stubborn black spots:
- Material assessment first, identifying whether the surface is concrete, a manufactured paver, or natural stone, since that determines every choice after it.
- A test patch before any full-surface treatment, checked for discoloration or etching before committing to the rest of the job.
- A chosen cleaning chemistry matched to the stain and the material, with calcareous stone kept away from anything acidic.
- A soak or dwell period appropriate to how bonded the staining appears, followed by gentle agitation rather than aggressive scraping.
- A controlled, low-pressure rinse and, where it fits the material, a sealing recommendation to slow recurrence.
Pricing depends on square footage and condition, and our patio cleaning cost reference lays out typical per-square-foot ranges so you know roughly what to expect before a quote arrives.
Keeping Black Spots from Coming Back
Prevention takes less effort than repeated deep cleaning, and most of it comes down to limiting moisture and organic buildup where growth starts.
- Sweep or blow off leaves and debris weekly, especially in fall, since decomposing organic matter feeds the algae and moss that turn into black spots.
- Clear debris from joints and corners, not just the open surface, because trapped material there holds moisture longest.
- Do a thorough spring clean after winter, checking and clearing nearby drains and gutters that might be shedding water onto the patio.
- Trim overhanging branches and shrubs that keep sections of the patio shaded and damp, since shade and poor airflow are the conditions biological growth favors most.
Sealing has real benefits here. It can make future stains sit on the surface instead of soaking in, which makes them far easier to wipe away, and it helps stabilize joint sand against erosion. It isn’t mandatory for every patio, though, and the wrong sealer on the wrong stone can trap moisture instead of blocking it, so match the product to the material before applying.
Pro Tip: Skip metal scrapers for routine debris removal; the tiny shavings they leave behind rust and create new dark spots that look just like the stains you were trying to remove.
Avoid replenishing joint sand excessively after every cleaning. A light, even top-up after heavy rain or a deep clean is usually enough; overfilling joints restricts drainage and can push moisture back toward the surface.
When Cosmetic Perfection Isn’t Worth the Risk
The instinct with black spots is to scrub until every trace disappears, but that instinct can work against you on natural stone. A pollutant crust that’s bonded with the surface will come off with some of the stone attached, and chasing a perfectly spotless finish on limestone or travertine sometimes means removing more material than the stain is worth.
Repeated gentle treatments beat one aggressive pass, especially on older or softer stone where surface loss adds up over time. A lighter biocide soak done twice with patience in between usually outperforms a single harsh attempt, and it leaves the stone in better shape for the next cleaning cycle.
If a patio has historic value, unusually soft stone, or stains that keep returning despite careful treatment, it’s worth prioritizing preservation over a flawless appearance and getting an assessment from someone experienced with that specific material before trying anything stronger.
— Richard
Let Us Handle the Stubborn Spots for You

When a patio’s black spots have soaked into pollutant crusts or settled into porous natural stone, a store-bought spray and a rented pressure washer only go so far. We bring the material-specific chemistry, dwell-time discipline, and gentle technique that heavier biological growth and bonded crusts actually need, backed by hands-on field experience with exactly these problems.
A first visit typically includes:
- A full material assessment so the cleaning plan fits your specific patio, not a generic approach.
- A test patch before any full treatment, so you see the result on a small area first.
- A written estimate based on square footage and condition, with no surprises once work starts.
Ready to see what a professional soft-soak can do for your patio? Book a pressure washing visit to request a quote for your space.
FAQ
How can I remove black spots from my patio?
Start with a test patch, then apply a biocide or algae cleaner for biological growth, or oxygen-based bleach for general pollutant staining, letting the product sit for its full dwell time before rinsing. Avoid acidic cleaners on natural stone like limestone, marble, or travertine, since they etch the surface permanently.
What is the best black spot removal spray?
The right product depends on the cause: dedicated lichen removers work differently from algicides or oxygen bleach cleaners, so matching the product class to what’s actually growing matters more than any single brand. Check the label for biocide or lichen-specific formulations if the spots are scaly and crusty rather than slimy.
Is dish soap good for cleaning a patio?
Dish soap can help lift light surface grime and is generally gentle enough for most patio materials, but it won’t kill the biological growth behind lichen, algae, or moss, so spots tend to return quickly. For a lasting result, a biocide or algae-specific cleaner addresses the underlying growth rather than just the surface dirt.
Does black spot ever go away?
Light surface growth can be fully removed with the right biocide and enough dwell time, but bonded pollutant crusts sometimes leave a faint shadow even after proper treatment, since they’ve partly fused with the stone itself. Repeated gentle cleanings over time usually get the best result without damaging the surface.
Why do black spots keep coming back on my patio?
Recurring spots usually mean the underlying conditions, shade, trapped moisture, or leaf debris in joints, haven’t changed, so growth simply re-establishes. Clearing debris regularly, improving drainage, and reducing nearby shade address the cause instead of just the symptom.
Sources
- Keeping It Clean: Removing Exterior Dirt, Paint, Stains and Graffiti from Historic Masonry Buildings
- Hardscaping for All Seasons: How to Maintain Your Paver Patio Year-Round – Concrete Masonry & Hardscapes Association
- Black Spot Remover for Patio Tiles; Wave Bye to Scaly Lichen for Good! — FILA Solutions blog