
1–1.5% Soft Wash: Pressure Washing Siding Safely for Homeowners
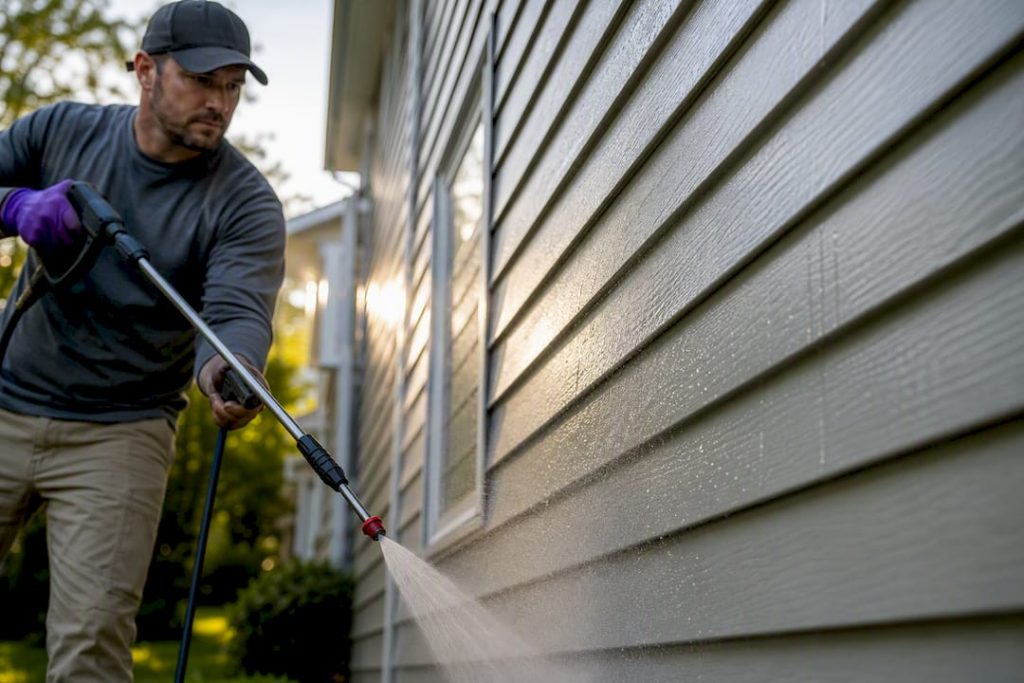
Soft washing, not brute-force pressure, is the safer default for most siding, and skipping the safety basics is what turns a Saturday project into a repair bill. Stick to wide 25° to 40° nozzles, angle the wand downward, never upward into the laps, and keep a steady standoff distance from the surface, as Stihl USA’s cleaning guidance recommends. Skip the DIY approach entirely on homes built before 1978 with unverified paint, on damaged panels, or anywhere access requires a ladder on uneven ground.
TL;DR:
- Use a wide 25° to 40° nozzle and keep the wand at 12 to 18 inches during rinsing to avoid cracking or damaging vinyl and soft siding materials.
- Test a small, hidden section first and follow manufacturer guidance, especially on homes built before 1978, to prevent voiding warranties or aerosolizing lead paint particles.
- Keep pressure below 1,500 PSI during rinsing and apply detergent at 100 to 200 PSI with a 1 to 2% sodium hypochlorite mixture for longer-lasting results.
- Avoid spraying upward into laps, working in shaded sections, and never rush or use narrow, concentrated nozzles that can cause cracks or gouges.
- For complex, high, or damaged projects, hiring a professional is recommended to ensure proper containment, technique, and siding safety.
Table of Contents
- Can You Pressure Wash Siding? It Depends on the Material
- What Nozzle, PSI, and Detergent Should You Use on Siding?
- Soft Wash vs. Pressure Washing: Why Chemistry Usually Wins
- How Do You Pressure Wash Siding Step by Step?
- The Mistakes That Cause the Most Siding Damage
- When Should You Just Hire a Professional?
- What E and R Cleaning Solutions Has Learned From Real Siding Jobs
- Get Your Siding Cleaned Right the First Time
- Sources
- FAQ
Can You Pressure Wash Siding? It Depends on the Material
Yes, but “can” and “should” aren’t the same question. Vinyl siding tolerates a soft wash approach well and handles a careful low-pressure rinse, but it cracks fast under a narrow, concentrated stream. Aluminum siding dents if you get too close or crank the pressure too high. Fiber cement holds up to gentle rinsing but can lose its factory finish under aggressive scrubbing. Wood and stucco are the trickiest: wood absorbs water and rots from the inside if you force moisture behind the boards, and stucco can pit or streak if the wrong nozzle gets too close. Brick generally handles more pressure than any of these, but mortar joints are a different story and deserve a test spot first.
Before you touch the trigger, run through this quick check:
- Test an inconspicuous section first, ideally a spot hidden behind a shrub or around back.
- Check your siding manufacturer’s cleaning guidance. Some warranties get voided by improper pressure washing, and that’s not a risk worth taking over a few streaks of mildew.
- Inspect for loose panels, cracked caulk, or gaps around trim before you start.
- If your home was built before 1978, assume the paint may contain lead until you’ve tested it. Disturbing lead paint with pressurized water aerosolizes particles you don’t want in your yard or your lungs.
If any of those checks turn up a red flag, stop and call a professional rather than guessing your way through it. A pre-1978 home with peeling paint, or siding with visible rot or structural sag, isn’t a beginner project.
What Nozzle, PSI, and Detergent Should You Use on Siding?
Get the equipment settings wrong and you won’t see the damage until it’s already done. The nozzle matters more than almost anything else in this job. Stick to a 25° or 40° fan tip for rinsing, and never touch a 0° or 15° nozzle, or a rotary “turbo” tip, anywhere near your siding. Those narrow streams concentrate enough force to crack vinyl panels or gouge soft wood, according to Stihl’s siding guidance. Most homeowner pressure washer kits color code these: black is usually the detergent tip, white or green are your rinse tips.
Pressure ranges depend on what you’re doing at that moment:
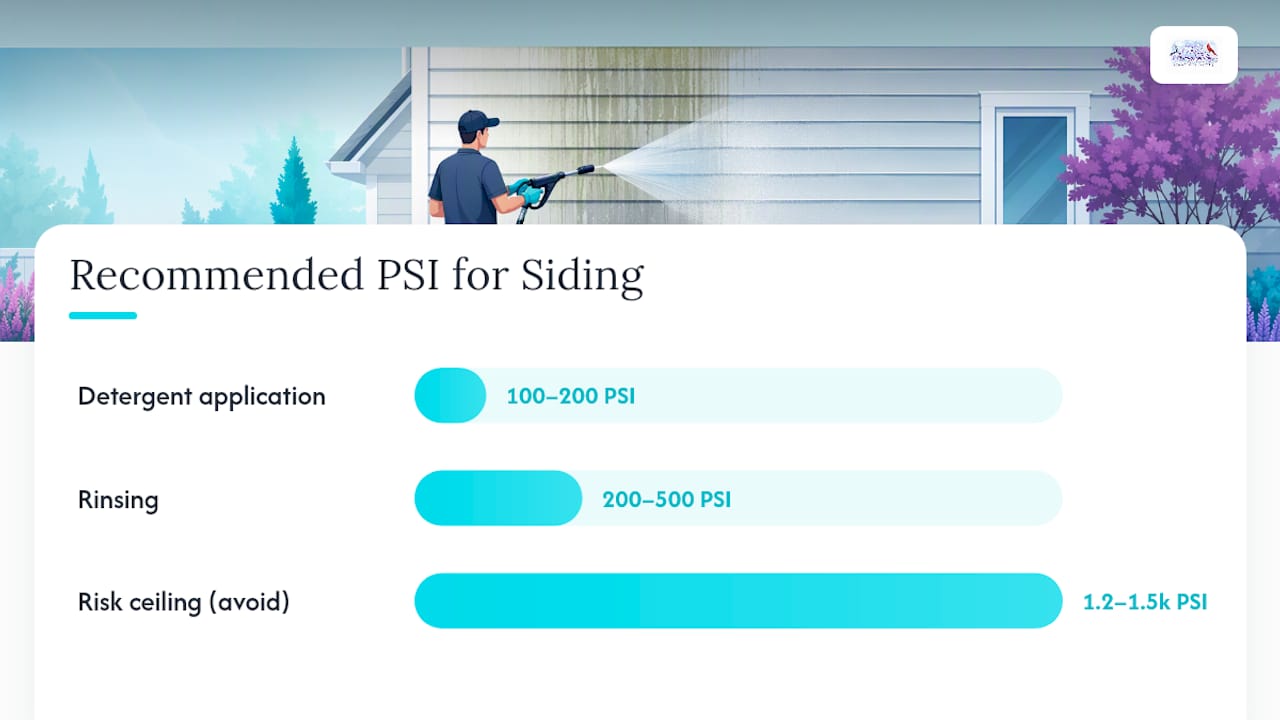
- Detergent application: 100 to 200 PSI is plenty. You’re not blasting anything off yet, just coating the surface.
- Rinsing: 200 to 500 PSI handles most siding without forcing water where it doesn’t belong.
- Avoid the high settings meant for concrete or driveways. Anything above roughly 1,200 to 1,500 PSI on siding starts pushing into risky territory, and Consumer Reports flags that range as a reasonable ceiling for many siding types, not a target to aim for.
Standoff distance changes the math on all of this. Keep the wand 12 to 18 inches away during application and 6 to 12 inches during rinsing, and open that gap even wider if you’re running higher PSI or you’re new to the tool. Moving in closer doesn’t clean faster, it just multiplies the force hitting the surface, which is exactly how Popular Mechanics explains sudden panel damage that homeowners didn’t see coming.
Pro Tip: If you’re not sure your PSI setting is safe, start low and walk toward the surface slowly while watching for streaking or lifted paint. It’s much easier to bump the pressure up a notch than to undo a crack in a vinyl panel.
Soft-wash chemistry does the heavy lifting here, not force. Most downstream injector systems draw a stronger tank mix and dilute it on the way out, landing on the surface at roughly 1 to 2% sodium hypochlorite, the industry-standard target for siding cleaning. Pair that with a surfactant so the solution clings to the surface instead of running off in seconds, and give it a 5 to 10 minute dwell time to actually work.
Before you mix anything, gear up with chemical-resistant gloves, eye protection, and old clothes you don’t mind bleaching — following key pressure washing safety practices for operators and homeowners. Cover outdoor outlets, light fixtures, and vents with plastic and tape. Wet down nearby plants beforehand and rinse them afterward so runoff doesn’t scorch your landscaping.
Soft Wash vs. Pressure Washing: Why Chemistry Usually Wins
Pressure alone removes what you can see. Soft-wash chemistry kills what’s growing underneath, which is the actual difference that determines how your siding looks in six months, not six days. Mildew and algae root into the microscopic texture of vinyl and fiber cement. Blast the visible growth off with plain water and pressure, and you’ve left the spores intact. They regrow, often within weeks, especially in shaded or humid areas of the house.
Soft washing addresses the organism, not just the stain. Operators who use this method routinely report longer-lasting results than pressure-only cleaning, because the chemistry disrupts regrowth at the source rather than scrubbing the surface bare.
That doesn’t mean pressure has no place. A careful rinse still matters for:
- Rinsing off loosened detergent and dead organic matter after the dwell time.
- Spot-treating heavy dirt buildup near ground level, gutters, or downspouts.
- Materials like brick or certain fiber cement products that tolerate a firmer rinse than vinyl does.
When you do need a pressure-only pass on a stubborn spot, keep the same rules in play: wide nozzle, safe standoff, and short bursts rather than holding the trigger in one spot. If you want a deeper look at concentration ratios and how long results typically hold, E and R Cleaning Solutions’s soft-wash guide breaks down the numbers homeowners actually ask about.
How Do You Pressure Wash Siding Step by Step?
Once you’ve checked your materials and dialed in your settings, the sequence itself is straightforward, as long as you follow the order. Skipping steps or rushing the rinse is where most DIY jobs go sideways.
Before you start:
- Walk the exterior and note any loose panels, missing trim pieces, or gaps in caulking. Mark them so you avoid direct spray on weak spots.
- Pick a small, hidden section and test your detergent mix and nozzle setting there first.
- Cover outdoor outlets, light fixtures, HVAC vents, and any exposed wiring with plastic sheeting and tape.
- Wet down flower beds, shrubs, and lawn areas near the house so chemical runoff doesn’t burn them.
- Close all windows and doors tightly, including any that don’t latch perfectly, since water finds gaps you’d never expect.
Applying the detergent:
- Load your soft-wash mix into the downstream injector or a pump sprayer rated for the chemical.
- Work from the bottom of the wall up. This sounds backward, but it prevents the solution from streaking down through already-clean sections.
- Break the house into shaded sections and finish one before starting the next, especially on hot or sunny days.
- Let the detergent dwell for 5 to 10 minutes. Watch it closely: if it starts to dry before you rinse, mist it lightly with water rather than letting it bake onto the surface.
Rinsing:
- Switch to your rinse nozzle, the 25° or 40° fan tip, and start from the top of the wall.
- Work top-down in overlapping passes, keeping the wand moving constantly rather than holding it on one spot.
- Maintain your standoff distance the entire time. Do not lean in for stubborn spots. Increase dwell time instead.
- Keep the spray angled level or slightly downward. Never tilt the wand upward into the siding laps. Ferguson Home’s technique guide points out that upward spray forces water behind the panels and into the wall cavity, where it causes problems you won’t see for months.
After you finish:
- Do a visual walk-around while the siding is still wet. Look for anything that shifted, cracked, or came loose during the wash.
- Check window and door frames for water intrusion, and glance inside near those areas over the next 48 to 72 hours for unexpected dampness.
- If you’re planning to paint afterward, wait at least 24 to 72 hours for the siding to dry fully before applying primer or paint.
Pro Tip: Wash on an overcast day if you can swing it. Direct sun dries detergent fast, which cuts your dwell time short and leaves streaky results even with the right chemistry.
The Mistakes That Cause the Most Siding Damage
Every homeowner disaster story with a pressure washer traces back to one of five habits. Spraying upward into the laps tops the list, since it drives water directly into the wall assembly where it can sit and cause rot or mold long after the siding looks clean. Standing too close to the surface is a close second. Even a properly angled wide nozzle causes cracking or etching if you’re holding it six inches from vinyl at 500 PSI.
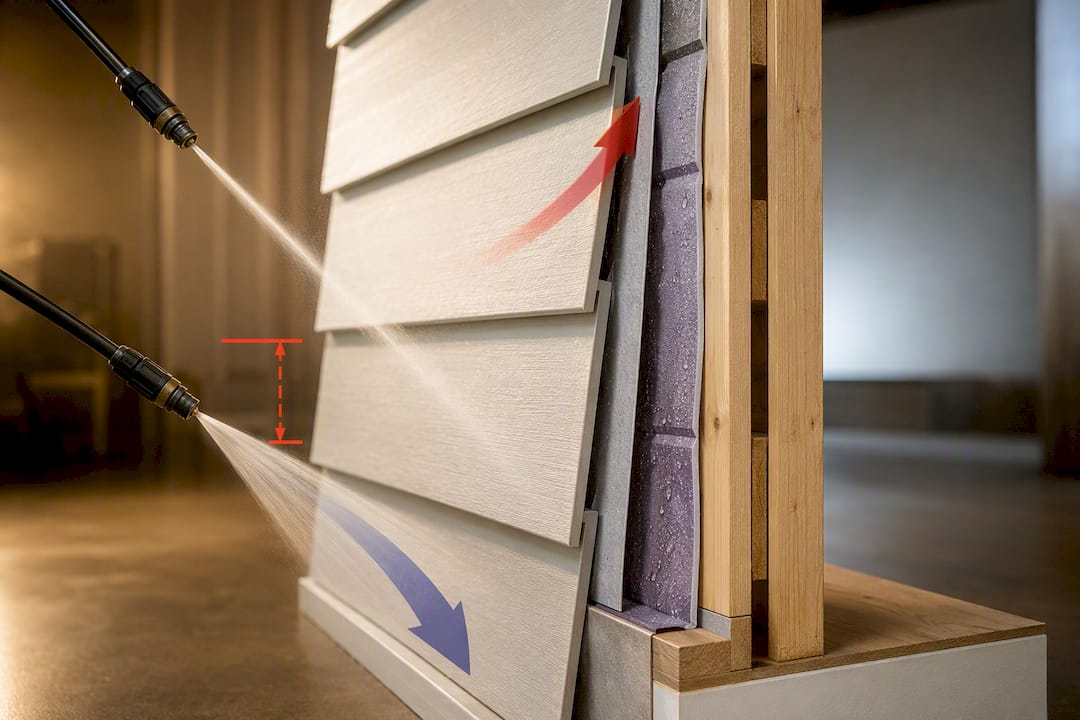
Using the wrong nozzle rounds out the physical damage category. That 0° “pencil” tip meant for stripping paint off metal has no business touching siding of any kind. Beyond equipment mistakes, timing errors do plenty of damage too: letting detergent dry on the surface before rinsing leaves chalky residue and streaks that are genuinely hard to remove without a second pass. Washing in cold weather, generally below 40°F, risks the detergent freezing on contact and the water itself freezing inside cracks and joints.
The fixes mirror the mistakes directly:
- Keep your standoff distance constant, and increase it rather than decrease it when in doubt.
- Use wide nozzles exclusively, angled level or downward, never upward.
- Work in shaded sections so detergent doesn’t flash-dry before you can rinse it.
- Check the weather forecast and skip the job if temperatures are near freezing.
Once you’ve finished, run a quick post-wash inspection. Look for cracked or warped panels, caulk that’s pulled away from window and door frames, water pooling in soffit vents, or any staining creeping onto interior walls near exterior corners. A musty smell in a room near an exterior wall a day or two later is a strong sign water got somewhere it shouldn’t have. Catching that early, before drywall or insulation absorbs more moisture, saves you from a much bigger repair.
When Should You Just Hire a Professional?
There’s a point where the smart move is picking up the phone instead of the wand. Complex access, second-story siding, steep rooflines nearby, homes with pre-1978 paint you haven’t tested, or any visible structural concern like sagging panels or rotted trim, all belong to a professional. So does any job where you want proper containment of runoff, particularly around storm drains or shared property lines.
A reputable pro brings a few things a homeowner setup usually can’t match: a documented pre-inspection that catches problems before the water ever turns on, a properly calibrated downstream soft-wash system rather than a guessed dilution ratio, and techniques that respect your siding’s warranty terms instead of accidentally voiding them.
Cost varies by home size, siding material, and how much detergent dwell and rinsing the job actually needs, so get a few quotes rather than assuming a flat rate. When you do, ask directly about insurance coverage, how they handle wastewater and runoff containment, and what soft-wash chemistry and concentration they plan to use on your specific siding.
— Richard
What E and R Cleaning Solutions Has Learned From Real Siding Jobs
A family-run operation has spent several years cleaning siding, driveways, and windows for homeowners and property managers who want the job done right the first time. The soft-wash concentrations described earlier in this guide, roughly 1 to 1.5% on the surface reflects the range the crew relies on for most vinyl and fiber cement jobs. The same goes for the paint timing rule: wait 24 to 72 hours after washing before priming or painting, and keep pressure settings conservative around windows and glazing, a principle covered in more depth in E and R Cleaning Solutions’s window-pressure guide. None of this comes from theory. It comes from the same checklist the crew runs on every property, whether it’s a single-family home or a multi-unit rental.
Get Your Siding Cleaned Right the First Time
Reading through nozzle angles, PSI ranges, and dwell times is one path. Booking a crew that already knows those numbers cold is the other, and it’s the one that skips the risk of a cracked panel or water forced behind your siding. Professional cleaning services handle the soft-wash chemistry, the containment, and the technique in one visit, with custom pricing built around your home rather than a one-size-fits-all package.

This matters most for homes with pre-1978 paint, damaged trim, or hard-to-reach second stories, exactly the situations where this guide tells you to stop and call a professional. It also matters if you just don’t want to spend a Saturday testing nozzle distances on your own siding. E and R Cleaning Solutions’s soft-wash siding service uses the same 1 to 1.5% on-surface concentrations discussed above, applied by a crew that’s already tested it on hundreds of homes. If your siding needs more than a rinse, get a custom quote and find out what a properly contained, warranty-safe cleaning actually costs for your property.
Sources
- How to clean siding (Stihl USA)
- Pressure Washing Vinyl Siding: Complete Operator Guide · MakeWash
- Can you pressure-wash it? (Consumer Reports)
- How to pressure wash a house (Popular Mechanics)
- How to clean siding with a power washer (Ferguson Home)
FAQ
Is It Okay to Power Wash Your Siding?
Yes, for most vinyl, fiber cement, and brick siding, as long as you use a wide 25° to 40° nozzle, keep pressure in the safe range, and never spray upward into the laps. Skip it on pre-1978 painted homes until you’ve tested for lead, and on any panel that’s already cracked or loose.
What Do You Spray on Siding Before Pressure Washing?
A soft-wash detergent mix, typically applied through a downstream injector, targeting roughly 1 to 2% on-surface sodium hypochlorite combined with a surfactant. Apply it bottom-up and let it dwell 5 to 10 minutes before rinsing.
How Much Does It Cost to Get Your Siding Power Washed?
Cost depends on your home’s size, siding material, and how much soft-wash chemistry and containment the job requires, so pricing varies from one property to the next. Getting a custom quote from a local provider like E and R Cleaning Solutions is the most reliable way to know your actual number.
Is It Better to Pressure Wash or Soft Wash Vinyl Siding?
Soft washing is generally the better choice for vinyl because the chemistry kills mildew and algae at the root instead of just blasting off what’s visible. Pressure-only cleaning often looks clean at first but lets growth return within weeks since the spores survive underneath.