
Homeowners: Absorb, Degrease, Poultice, Rinse Driveway Oil
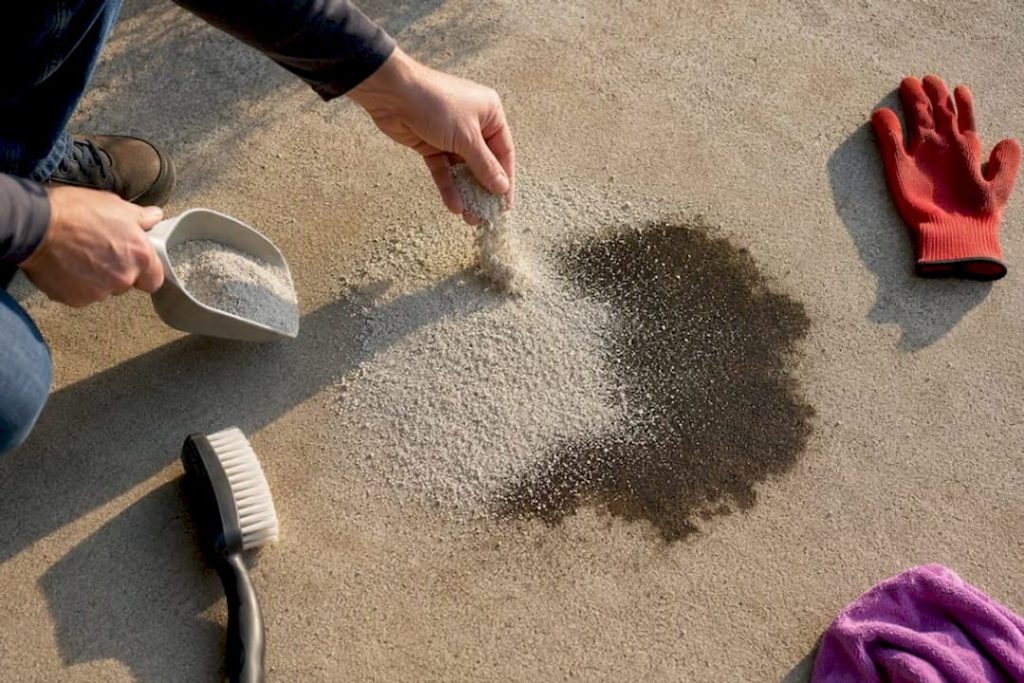
Fresh oil comes up fast if you act now: cover it with clay-based kitty litter or oil-dry before it soaks in deeper, then sweep and bag the residue. Older stains rarely respond to one cleaning. Expect to run degreaser cycles, or build a poultice for anything set in for months. Skip the storm drain entirely, and bag every contaminated absorbent instead of hosing it into the yard.
TL;DR:
- Absorb fresh oil spills quickly with clay-based litter or oil-dry, leaving it to sit for at least 30 minutes before sweeping up to prevent deeper penetration.
- Older stains often require multiple degreaser cycles, poultice treatments, or mechanical grinding, but complete removal of years-old stains may be impossible.
- Concrete surfaces tolerate stronger treatments like full poultice and alkaline degreasers, while asphalt and pavers require milder products to avoid surface damage.
- Pressure washing should follow thorough absorption and degreasing, using appropriate equipment and technique to avoid spreading contamination or damaging the surface.
- Proper disposal of contaminated absorbents and rinse water safeguards environmental health and prevents legal issues; consider professional help for stubborn or large stains.
Table of Contents
- Quick Actions for a Fresh Oil Spill
- What You Need Before You Start Treating the Stain
- How to Treat Stains Based on Age
- Does Your Driveway Material Change the Approach?
- When and How to Pressure Wash Safely
- How to Dispose of Oily Runoff and Waste
- When It’s Time to Call a Professional
- The Real Bottleneck Isn’t the Chemical, It’s the Sequence
- Get a Driveway Stain Estimate Instead of Guessing
- Sources
Quick Actions for a Fresh Oil Spill
The first hour after a spill decides how much work you’ll do later. Oil that sits on the surface for even a day starts migrating into the concrete’s pores, and once it’s there, a quick rinse won’t touch it.
- Contain it first. Block nearby storm drains and lay towels or cardboard around the edge of the puddle so it doesn’t creep toward grass or landscaping.
- Bury it in absorbent. Pour clay-based cat litter or a commercial oil-dry product directly over the spill, thick enough to fully cover it, and press down lightly with your foot or a board.
- Wait it out. Let it sit anywhere from 30 minutes to several hours depending on how much oil you’re dealing with. Clay-based litter pulls liquid into its granules rather than just sitting on top of it, which is why dwell time matters more than scrubbing at this stage.
- Sweep and bag. Once the absorbent looks saturated, sweep it up and seal it in a heavy-duty trash bag. Don’t rinse the spot until every bit of absorbent is gone.
Pro Tip: Resist the urge to hose down a fresh spill right away. Rinsing before you absorb just spreads a thin film of oil across a wider area of concrete, and now you’ve got a bigger stain to treat instead of a contained one.
What You Need Before You Start Treating the Stain
Gather your supplies before you touch a single degreaser, so you’re not mid-scrub when you realize you’re missing something.
- Clay cat litter or a commercial oil-dry absorbent
- Dawn dish soap or a concrete-safe degreaser
- Stiff nylon brush or a push broom
- Bucket, plastic sheeting, and a putty knife
- Heavy-duty trash bags for disposal
- Nitrile gloves and eye protection
Work in a ventilated area if you’re using anything solvent-based, and keep it away from open flames or pilot lights. Test any product in a small, hidden corner first. Strong solvents can eat into asphalt’s binder, and a wire brush will chew up concrete’s surface faster than it lifts the stain.
Pro Tip: Dawn dish soap works surprisingly well as a first-line degreaser because it’s formulated to break down grease, not just mask it. It’s often the gentlest effective option before you reach for anything stronger.
How to Treat Stains Based on Age
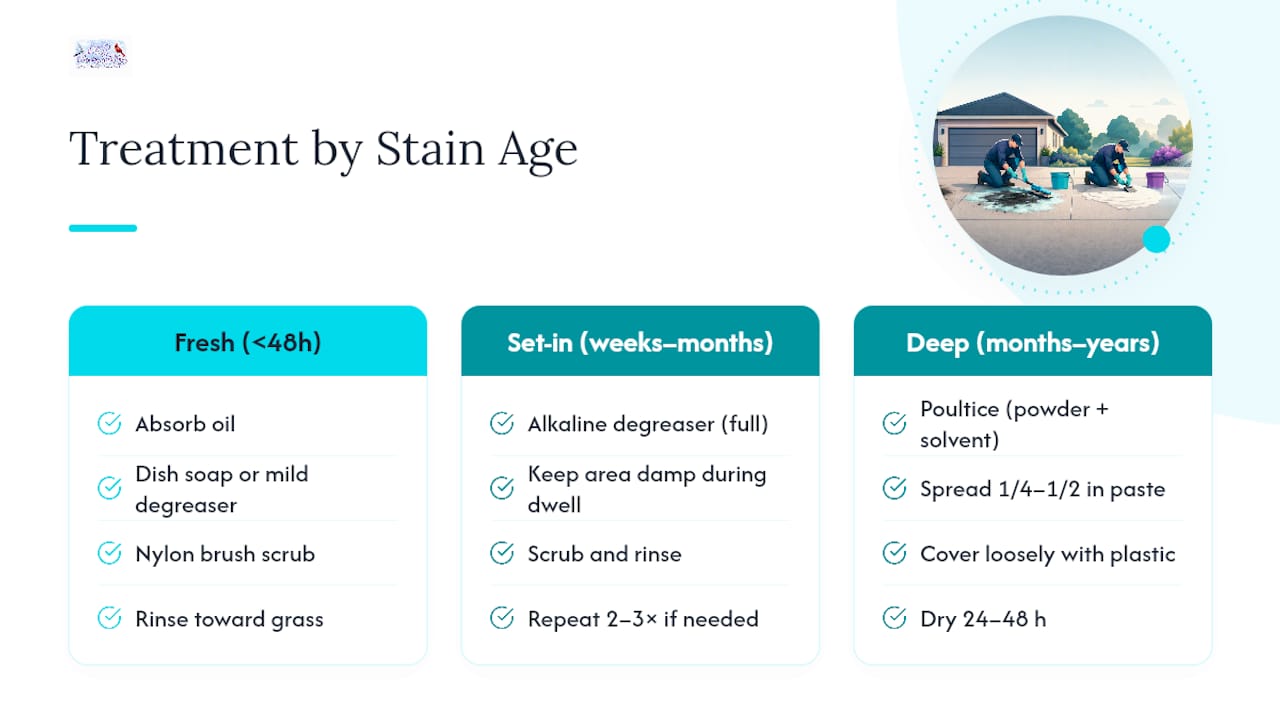
Not every oil stain deserves the same treatment. Matching the method to how long the stain has been there saves you time and keeps you from over-treating a spot that would have come clean with soap and water.
1. Fresh stains (under 48 hours): Absorb first, then work in a small amount of dish soap or a mild degreaser with a nylon brush. Rinse in a controlled way, directing water toward a grassy area rather than a drain.
2. Set-in stains (weeks to months old): Apply a concrete-safe alkaline degreaser at full strength. Success here comes down to sequence and patience more than chemical strength — keep the area damp during the dwell period listed on the product label, scrub, rinse, and check the results once the concrete dries. Expect to repeat this two or three times before you see real improvement.
3. Old and deeply embedded stains (months to years): This calls for a poultice. Mix an absorbent powder with a compatible solvent or degreaser into a paste, spread it a quarter to a half inch thick over the stain, and cover it loosely with plastic sheeting. Poultice drying times of 24 to 48 hours tend to produce the best draw, because the slow evaporation pulls oil up out of the concrete’s pores rather than just sitting on top. Remove the crust, scrub, and repeat if a shadow remains.
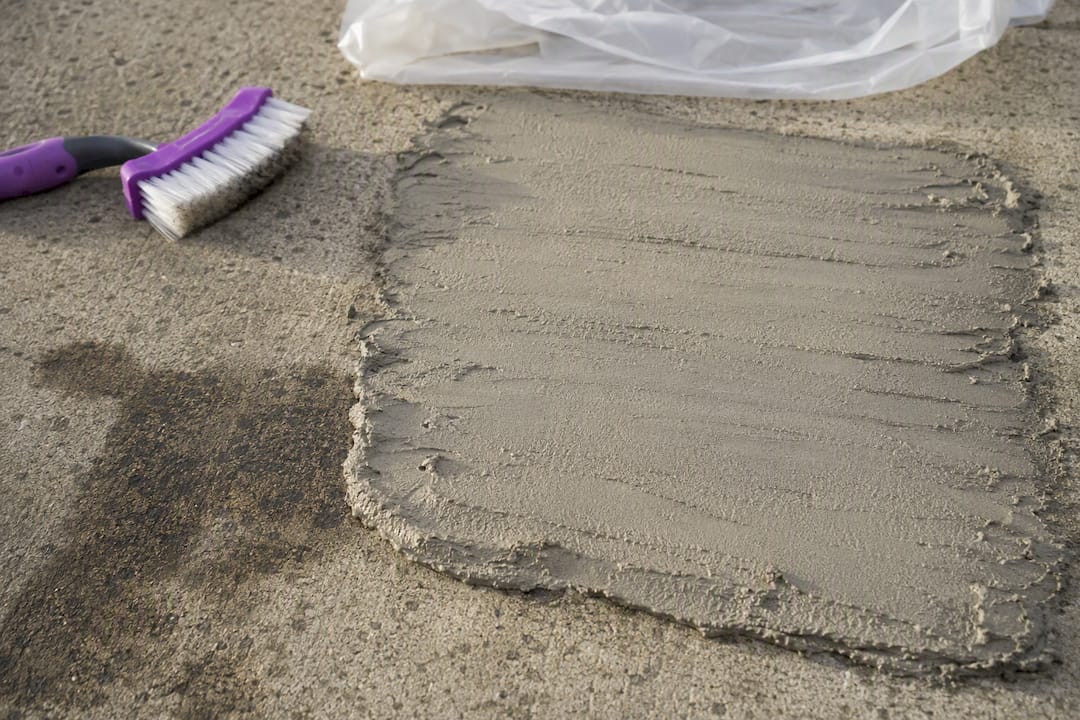
If none of that budges a stain, mechanical grinding is the last resort, and it comes with its own trade-offs: it changes the surface texture and color where it’s used, so treat it as a final option, not a shortcut.
Set your expectations early. Deep, years-old stains often fade rather than disappear completely, even after multiple cycles of degreaser or poultice. That’s not a failure on your part. It’s just how petroleum interacts with a porous surface once it’s had years to settle in.
Does Your Driveway Material Change the Approach?
Concrete, asphalt, and pavers don’t respond to oil the same way, and using the wrong method on the wrong surface can cause more damage than the stain itself.
- Concrete tolerates stronger alkaline degreasers and full poultice treatments well. It’s also more porous than people expect, so it dries slowly after treatment. Don’t rush the follow-up cycle before it’s fully dry.
- Asphalt contains a petroleum-based binder, which means strong solvents and acids can soften or strip the surface itself. Stick to milder surfactant-based cleaners and run more cycles instead of reaching for something harsher.
- Pavers and block surfaces need a test patch in an inconspicuous corner before you commit to any product. Polymeric joint sand between pavers can wash out or discolor with heavy rinsing, so keep water flow controlled and avoid blasting directly into the joints.
If you’re unsure what’s driving discoloration on your surface beyond oil, understanding what causes concrete staining in the first place helps you pick the right product instead of guessing.
When and How to Pressure Wash Safely
Pressure washing belongs at the end of the process, not the start. Running a wand over an oil stain before you’ve absorbed and degreased just pushes contamination deeper into the pores and spreads slurry across more of the slab.
- Use a moderate pressure appropriate for your machine, and keep the wand a safe distance from the surface.
- A surface cleaner attachment spreads pressure evenly and avoids the striping you get from a single jet nozzle.
- Use a 25 to 40 degree nozzle and sweep from the highest point of the driveway down toward the lowest, so runoff has somewhere to go.
- Technique and equipment choice matter as much as raw pressure for getting an even clean without damaging the surface.
- Work in short, controlled passes rather than flooding one spot, and check the area again once it’s dry. If a shadow reappears, that spot needs another round of localized degreaser before you pressure wash again.
Pro Tip: If you’re renting equipment for the first time, practice the sweeping motion on a section of driveway without a stain. Getting a feel for distance and angle before you tackle the actual stain prevents uneven cleaning patterns you’ll notice for months.
For a closer look at technique on adjoining surfaces, our step-by-step walkway pressure washing guide covers similar sequencing for sidewalks and paths.
How to Dispose of Oily Runoff and Waste
What you do with the mess matters as much as how you clean it. Oil-contaminated water and absorbents count as hazardous waste in most municipalities, and dumping them carelessly can mean fines, or worse, pollution that reaches local waterways.
- Bag and seal every piece of used absorbent, rags, and poultice residue before it goes in the trash, and check your city’s household hazardous waste rules for anything beyond small quantities.
- Never let oil-laden rinse water run into a storm drain. Direct it toward a contained area, or use absorbent barriers to keep it off the pavement’s edge entirely.
- If your driveway sits close to a floor drain or grease trap, a clogged line can turn a cleanup project into a plumbing headache. Clearing a grease-clogged drain properly avoids compounding one mess with another.
- Keep solvents away from ignition sources, work in ventilated spaces, and wear gloves and eye protection throughout.
When It’s Time to Call a Professional
Some stains just aren’t a weekend project. If you’ve run two or three degreaser cycles with no improvement, if the stain covers a large section of the driveway, or if you’re worried about damaging the surface with the wrong product, that’s the point to bring in a pro.
Professional crews work with commercial-grade extraction products and poultice formulas that go beyond what’s sold at a hardware store. They also have access to controlled grinding equipment with dust suppression for the rare cases where mechanical removal is genuinely the only option, along with insured workmanship and documented waste handling that protects you from liability. Understanding what a typical driveway pressure wash costs helps you gauge whether a quote is fair before you commit. Professional services handle this kind of escalation for homeowners who’ve hit the limit of what a DIY approach can fix.
The Real Bottleneck Isn’t the Chemical, It’s the Sequence
Most people treat oil stain removal like a product problem. Buy the strongest degreaser, scrub harder, maybe try a specialty spray they saw online. That’s backwards. The research on this is consistent: dwell time and sequencing outperform brute force almost every time. A mild degreaser left to sit for the full recommended window beats a harsh one scrubbed and rinsed in five minutes.
The advice that’s actually underrated is patience with the poultice method. Homeowners pull the plastic off after a few hours because they’re impatient, then conclude poultices “don’t work.” A 24 to 48 hour draw is what makes the technique effective in the first place. Rushing it defeats the purpose entirely.
If there’s one thing to prioritize, it’s containment. Bag your absorbents, keep runoff off the pavement’s edge, and resist the instinct to just hose everything toward the street. That single habit protects your property value and keeps you clear of any local disposal violations, which matters more than most people realize until they’re dealing with a fine.
— Richard
Get a Driveway Stain Estimate Instead of Guessing
If you’ve tried the absorb-and-degrease cycle a couple of times and the stain is still staring back at you, Professional cleaners can provide a faster route to a clean slab without another weekend lost to scrubbing. They typically inspect the stain, recommend the right method for your specific surface, whether that’s concrete, asphalt, or pavers, and give you a straightforward quote before any work starts.

An estimate typically follows three steps: we look at the stain’s age and depth, walk you through what treatment fits your driveway material, and price the job with no guesswork on your end. If you’d rather understand the process first, our homeowner’s guide to walkway pressure washing walks through what to expect. When you’re ready, check pricing for a driveway pressure wash and get a quote scheduled for your property.
Sources
- Garage Floor Oil Stains: How to Remove Them | The Garage Guide
- How to remove oil stains from driveways and garage floors | PROSOCO
- How to remove oil stains from a driveway | TheHouseMag
- How to pressure-wash a driveway | BobVila